

A successful natural gas line installation starts well before anyone picks up a shovel. It all comes down to careful planning, a thorough site assessment, and wading through local regulations. This initial phase is really your project's insurance policy, making sure everything is safe, legal, and efficient right from the start.
Getting this groundwork right is how you avoid expensive delays and dangerous mistakes later on.
Laying The Groundwork For Your Gas Line Project
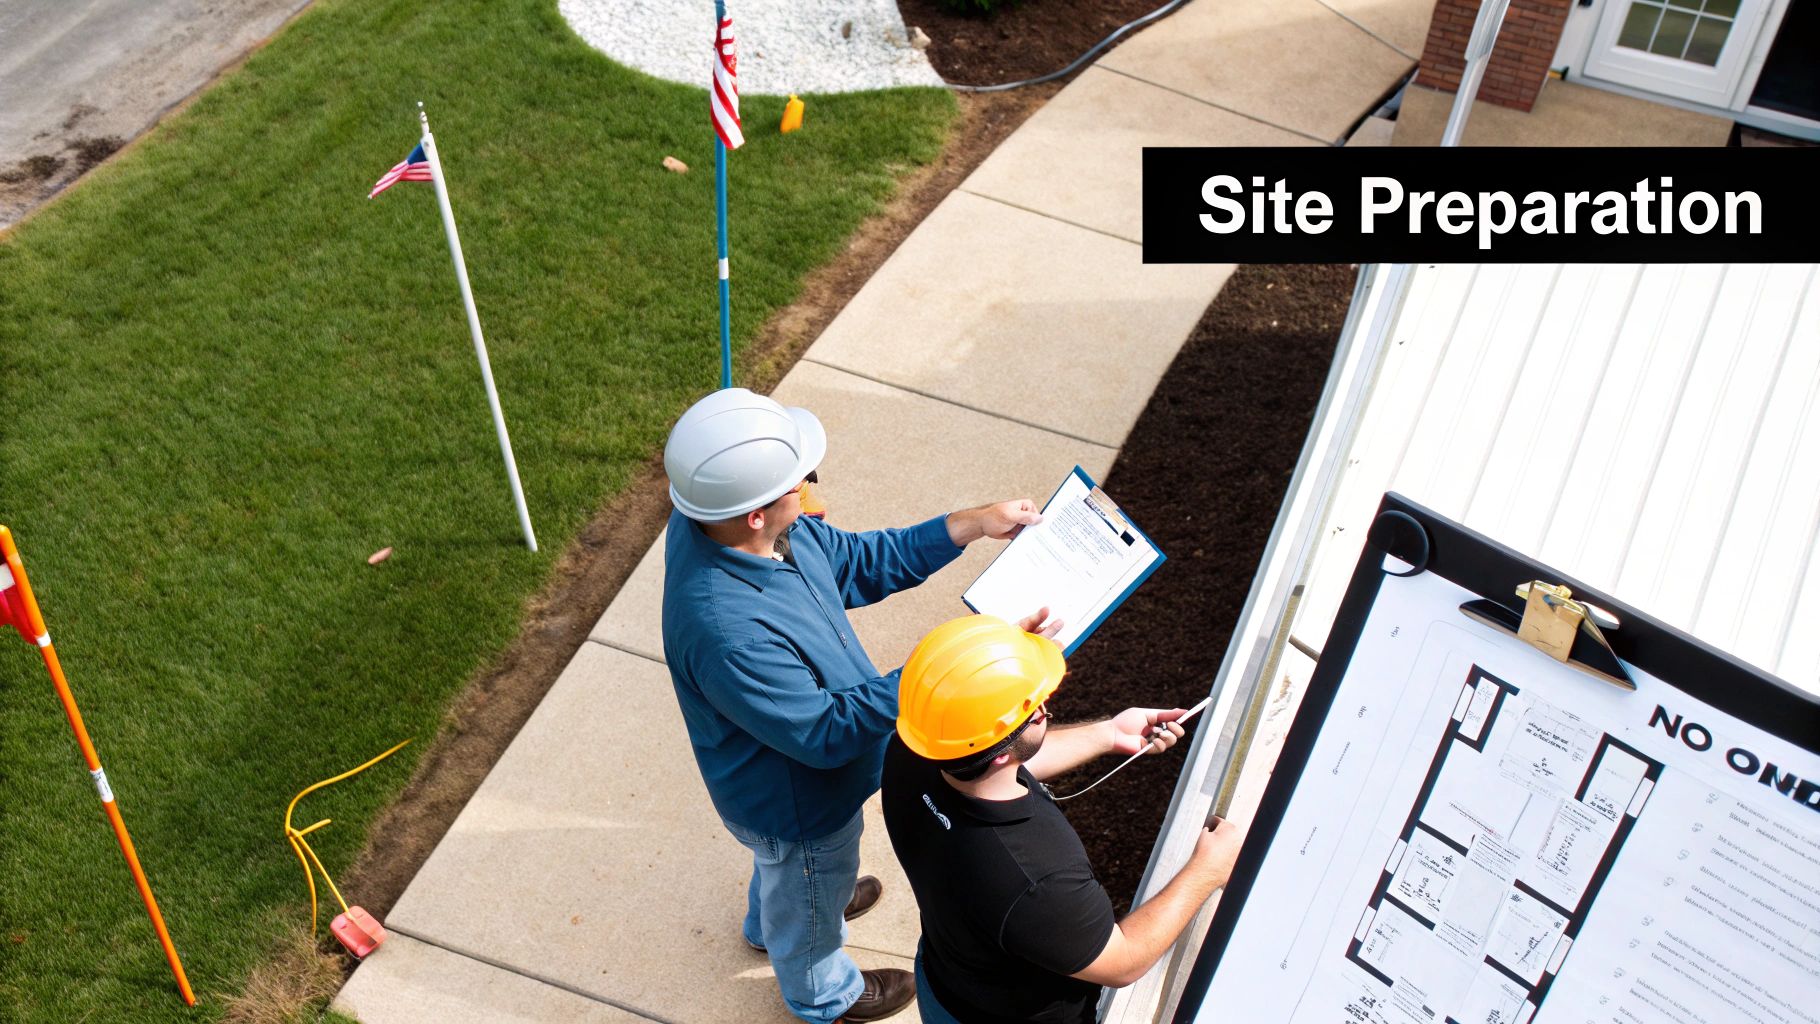
Before a single shovel hits the dirt, the quality of your preparation really dictates whether the project will succeed or fail. This isn’t just about filling out forms; it’s about creating a solid, compliant foundation that prevents massive headaches down the line. I’ve seen people try to cut corners here, and it almost always leads to failed inspections, utility strikes, or even a full stop to the project.
Think of this part as drawing a detailed map before a big road trip. You wouldn't just start driving without a destination, and you shouldn't start an installation without a clear plan that has the official green light. Investing the time upfront will absolutely pay off in a smooth, safe, and efficient job.
Navigating The Permitting Maze
Getting the right permits is the first, and most critical, hurdle. Every town and county has its own set of rules, and trying to bypass them is a recipe for disaster. The permitting office isn't trying to make your life difficult; their job is to enforce safety standards that protect you, the workers, and your community.
To get started, you'll need to pull together a solid application packet for your local building or planning department. Don't rush this part.
Your application will probably need a few key things:
- Detailed Site Plans: These aren't just simple sketches. They need to be professional drawings showing the exact route of the gas line, including how deep it will be, its distance from buildings, and where it connects.
- Load Calculation Letter: An HVAC pro or an engineer needs to provide a letter spelling out the total British Thermal Unit (BTU) load for all your gas appliances. This is how the inspector confirms the new line is sized correctly for the demand.
- Proof of Licensing and Insurance: The contractor doing the work has to show their credentials. This proves they're qualified and insured for a high-risk job like this.
One of the most common reasons for early delays is an incomplete application. I always tell my clients to double-check every single requirement before heading to the office.
Conducting A Thorough Site Assessment
While the permits are being processed, it's time for a full site assessment. This is where you get boots on the ground to see what you're really dealing with and finalize the installation plan. It's a hands-on process that’s all about spotting challenges and making sure the path for the new line is as safe and direct as possible.
The absolute first thing you must do is call 811. This is the national "Call Before You Dig" number, and it's a free service. They'll send crews out to mark the approximate locations of buried public utilities—water, sewer, electric, and communication lines. Hitting one of these is incredibly dangerous and can lead to huge fines and repair bills.
A utility strike isn't just an inconvenience; it can be a life-threatening event. This is a mandatory safety step. Make sure you plan for this to take a few business days, as the utility crews need time to visit and mark your property.
Beyond getting the utilities marked, a good site assessment involves checking the soil conditions, looking for obstacles like big tree roots or underground rocks, and confirming property lines. All this information helps the crew choose the right trenching method and bring the right equipment, ensuring the project gets started on the right foot and stays on schedule.
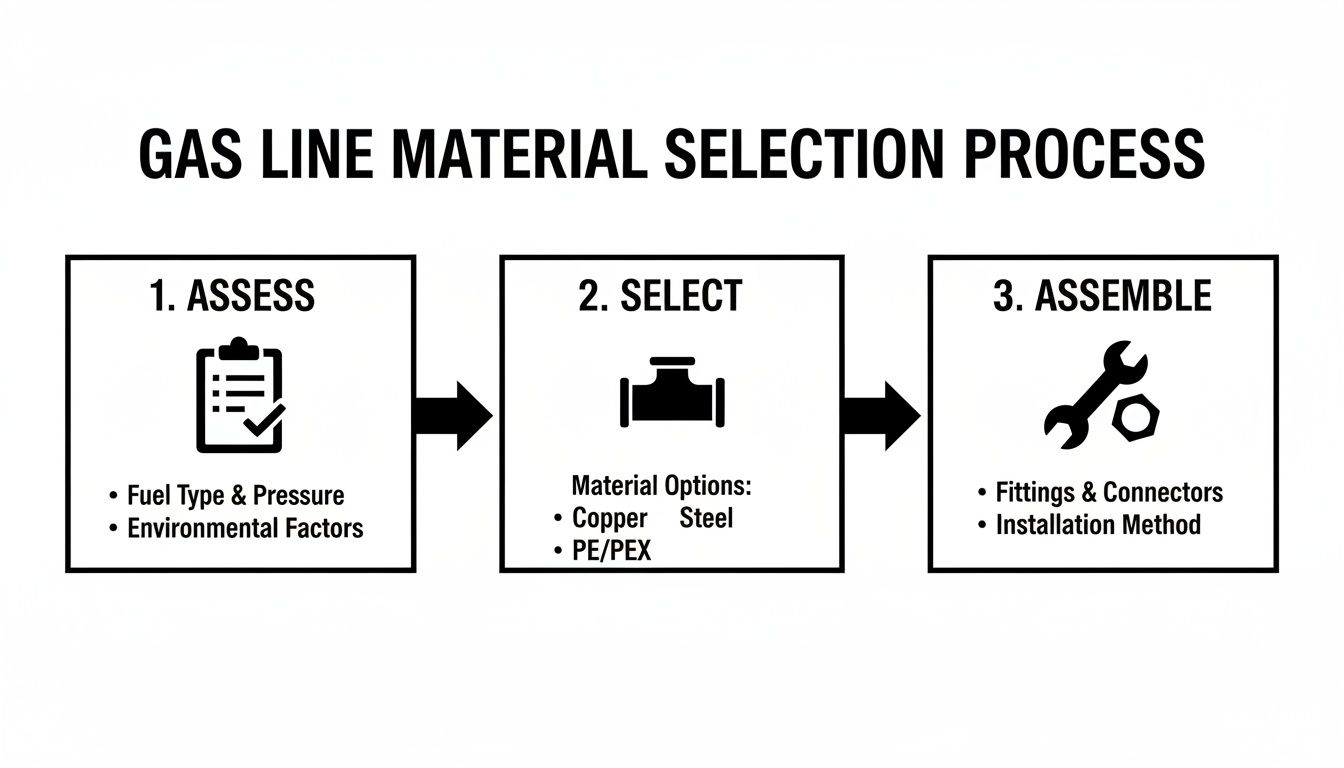
Choosing the Right Materials for a Safe Installation
When it comes to installing a natural gas line, the materials you choose are the foundation of a safe, long-lasting system. This isn't a place to cut corners. The quality of your pipe, fittings, and valves directly impacts the integrity of the entire installation, preventing dangerous leaks and costly future repairs.
Making the right choice is a bit of a balancing act. You have to think about where the line is going—is it buried underground or running through the walls of a house? You also need to be certain you're following local building codes, all while keeping the project budget in mind.
What Kind of Pipe Do I Need?
The three main players in the gas piping world are high-density polyethylene (HDPE), black steel, and copper. Each has a specific job, and using the wrong one can create a serious hazard. Getting familiar with their pros and cons is the first step to doing the job right.
Let's start with what's underground. That bright yellow pipe you sometimes see at construction sites is high-density polyethylene (HDPE). It’s the industry standard for buried gas lines for a good reason: it’s incredibly flexible and completely resistant to rust. This means it can handle shifting soil without cracking. The catch? You can't just glue it together. HDPE requires special heat fusion equipment to weld the joints, which is a skill that takes proper training to master.
For any gas line running inside your home or exposed above ground, black steel pipe has long been the go-to material. It's tough as nails and provides fantastic protection against being bumped or damaged. But it has its downsides. Steel is heavy, a pain to work with, and requires special threading tools to make connections. It will also rust if you don't keep it properly coated and away from moisture.
Beyond the Pipe: Fittings and Valves Matter
A gas line is only as reliable as its connections. Every single joint is a potential leak point if it isn't assembled perfectly, which is why your fittings and valves are just as important as the pipe itself.
If you're working with steel pipe, you'll be using heavy-duty malleable iron fittings. The key is to use the right pipe sealant—often called pipe dope—or PTFE tape to create a perfect, gas-tight seal on every single thread. For HDPE, you’ll use fusion fittings that are molecularly bonded to the pipe, creating a joint that’s actually stronger than the pipe itself.
When it comes to shutoff valves, ball valves are what you'll see in most modern setups. A good quality brass or steel ball valve gives you a quick and reliable way to shut off the gas with a simple quarter-turn, which is crucial in an emergency.
A Tip from the Field: Always install a dedicated shutoff valve right at each appliance. This simple step is a lifesaver. It lets you work on a single furnace or water heater without having to shut down the gas to the entire house.
The Right Tools for the Job
You can have the best materials in the world, but without the right tools, you're setting yourself up for failure. Installing a gas line requires some specialized equipment you won't find in a basic toolbox.
- Pipe Threader: Absolutely essential for cutting clean, tapered threads into steel pipe. A bad thread means a bad seal.
- Fusion Machine: This is the high-tech equipment needed to properly weld HDPE pipe and fittings together.
- Pipe Cutters & Reamers: These ensure your cuts on steel or copper are perfectly square and free of any burrs that could compromise a connection.
- Leak Detector Solution: It might just look like soapy water, but this stuff is non-negotiable. After pressurizing the system, you spray it on every joint. If you see bubbles, you've found a leak.
To help you decide what's best for your project, here’s a quick breakdown of the most common pipe materials.
Gas Pipe Material Comparison
Each material has its place in a gas system. The table below compares the big three to help you understand where and why each one is used.
| Material | Primary Use Case | Pros | Cons |
|---|---|---|---|
| HDPE (High-Density Polyethylene) | Underground exterior gas lines from the main to the building. | Highly flexible, corrosion-proof, and durable against ground movement. | Requires specialized fusion tools, susceptible to UV degradation if exposed. |
| Black Steel | Interior gas lines, appliance connections, and above-ground exterior runs. | Extremely strong, resistant to physical damage, and widely available. | Heavy, prone to corrosion if not protected, requires threading for connections. |
| Copper Tubing (Type K or L) | Certain interior applications and final connections to appliances (where codes permit). | Lightweight, easy to bend, and corrosion-resistant. | Softer and more easily damaged, often restricted by local building codes. |
Ultimately, choosing the right material comes down to following your local codes and understanding the demands of your specific installation. When in doubt, always consult with a licensed professional.
From Trenching to Tie-In: The Installation Process
Now for the hands-on part. Once you’ve got your plans approved and materials staged, it’s time to get the pipe in the ground. This is where all that careful preparation really pays off, turning a set of drawings into a safe, functional gas system. The work demands precision at every turn, from the first scoop of dirt to the final connection that brings the gas to your appliances.
Every job site has its own personality. A straightforward installation on a flat, clear lot is a world away from a project on a sloped property full of rocks and existing utility lines. A good installer knows how to read the site and adapt.
Digging the Trench with Purpose
First things first, you need a trench for the gas line to call home. This isn't just about digging a ditch; it's about creating a protective channel that will safeguard the pipe for decades.
Your local codebook is your bible here. Most jurisdictions require a minimum burial depth, typically 18 to 24 inches, to keep the line safe from surface traffic and seasonal frost heave. You also need to maintain a consistent grade (a slight slope) so moisture doesn't pool in low spots—a critical detail, especially for steel pipes that are prone to corrosion.
Before the pipe goes in, the trench needs proper bedding. We lay down a cushion of sand or fine gravel to create a soft, uniform base. This simple step is huge—it prevents sharp rocks from grinding against the pipe as the ground naturally settles and shifts over time.
Laying and Joining the Pipe
With the trench ready, the focus shifts to assembling the pipeline. How you join the pipe sections together depends entirely on the material, and each method is a specific skill aimed at one thing: creating a permanent, leak-proof bond.
This is the stage where the planning and material choices you made earlier come to life.
As you can see, the physical assembly is the final step in a logical process that starts with a thorough assessment.
If you're running underground HDPE pipe, the gold standard is heat fusion. A special machine heats the pipe ends and a fitting to their melting point. Then, they’re pushed together, creating a seamless joint that’s actually stronger than the pipe itself. No mechanical joints underground means fewer potential points of failure.
For black steel pipe inside a building, it's a totally different ballgame. We use a pipe threader to cut precise threads on the pipe ends. Then, we apply a high-quality pipe sealant and screw the pipe into fittings for a tight, reliable mechanical seal.
Navigating On-Site Surprises
I’ve yet to be on a job that went 100% according to plan. An experienced crew anticipates the unexpected and knows how to pivot safely.
- Unmarked Utilities: You call 811, but that doesn't mark private lines like sprinkler systems or wiring for landscape lighting. When you find one, you stop, reassess, and find a new, safe path.
- Rocky Ground or Massive Roots: When the digging gets tough, you bring in tougher equipment. A rock saw or hydro-excavator can clear a path without destroying the entire yard. The goal is always a clean trench with minimal disruption.
- Crossing a Driveway: Tearing up a perfectly good driveway is the last resort. We almost always use a boring machine to tunnel underneath. It saves a ton of time, money, and headache compared to cutting and patching concrete or asphalt.
The real mark of a pro isn't just following the plan—it's how they handle it when the plan goes out the window. Safety and code compliance are non-negotiable, even if it means a delay.
The All-Important Tie-In
The final, and most critical, step is the tie-in. This is the moment you connect the new line to the gas supply, both at the meter outside and to the appliances inside. There is zero room for error here.
First, we shut off the main gas supply at the meter. Only then do we make the final connection, ensuring every fitting is perfectly tightened and sealed. Inside, the new line gets connected to the furnace, water heater, or stove, with each appliance getting its own dedicated shutoff valve for future maintenance.
Once everything is connected, but before turning the gas back on, the entire system is put under a pressure test. This is the final proof. It verifies the integrity of every single joint and confirms the natural gas line installation is 100% sealed, safe, and ready for the final inspection.
How to Handle Project Delays and Supply Chain Issues
Even the most buttoned-up project plan for a new natural gas line can go sideways. These aren't just little hiccups, either. A delay can shelve your project for weeks or months, completely wrecking your budget and leaving everyone frustrated. The first step to creating a solid backup plan is understanding why these problems happen in the first place.
The truth is, the demand for natural gas is always on the rise, and it often runs smack into the physical reality of building out new infrastructure. It's a classic squeeze that means even minor issues can create major headaches for your timeline.
Common Causes of Installation Delays
A few usual suspects are behind most project stalls. One of the biggest offenders is the permitting process. You might budget a few weeks for approvals, but depending on the local jurisdiction, you could find yourself stuck in a multi-month ordeal thanks to backlogs or endless requests for more information.
Then there's the hunt for qualified labor. Finding skilled, certified technicians who know their way around a gas line installation can be tough, especially when the market is hot. This scarcity can easily push your project to the back of the line, leaving your site quiet when it should be buzzing.
And, of course, there are the supply chain nightmares we've all gotten used to.
- Pipe and Fitting Scarcity: Finding the specific diameter of HDPE or steel pipe you need can feel like a treasure hunt, with backorders stretching for months.
- Valve and Regulator Delays: Critical components like regulators or specialty valves can get stuck somewhere in transit, bringing your work to a dead stop.
- Equipment Availability: Even renting the right equipment, like a fusion machine or a trencher, can be a challenge during peak construction season.
This friction between what's needed and what's available is a real problem. The U.S. natural gas pipeline industry is on track to hit $42.4 billion in revenue by 2025, driven by an enormous need for new infrastructure. At the same time, the EIA is forecasting record-high consumption. It’s a system under constant pressure, making installation backlogs a serious, and common, issue. You can read more about the state of the gas pipeline industry to get the full picture of these infrastructure hurdles.
The Problem With Waiting
When that permanent gas line is delayed, the dominoes start to fall. Without gas, you can't fire up generators, test your HVAC systems, or run temporary heaters. That last one is a killer in cold weather, as it stops all interior work like drywalling and painting right in its tracks.
For builders, this is where things get critical. Many municipalities won't even think about issuing a temporary certificate of occupancy (TCO) without functional heating and hot water. This means your brand-new building can sit completely finished but totally empty—you can't sell it, you can't lease it, and all the while, the carrying costs are piling up.
The inability to secure a TCO is often the costliest consequence of a gas line delay. It directly impacts revenue and can lead to significant financial penalties if project deadlines are missed.
Creating a Bridge with Temporary Gas Solutions
This is where having a proactive strategy can literally save a project. Instead of just accepting a costly delay, you can bridge the gap with a temporary natural gas solution. You can bring in mobile compressed natural gas (CNG) or liquefied natural gas (LNG) units right to your site, giving you a reliable fuel source to use until the utility company finally gets the permanent line hooked up.
These mobile setups are designed to connect directly into your building’s gas piping, just downstream of where the utility meter will eventually sit. They work exactly like the real thing, delivering the same clean, efficient natural gas your equipment was designed to run on.
Here’s a real-world example I’ve seen play out: A new apartment complex is wrapping up in late fall, but the permanent gas line is hit with a two-month delay because the local utility is swamped. Without heat, all interior finishing work grinds to a halt. The developer can't get a TCO, which means they can't start leasing units.
By bringing in a mobile CNG trailer from a provider like Blue Gas Express, they were able to power the boilers immediately. This simple move allowed them to secure their TCO, start signing leases, and keep the entire project moving forward, avoiding what could have easily been a six-figure loss.
Passing Your Final Pressure Test and Inspection
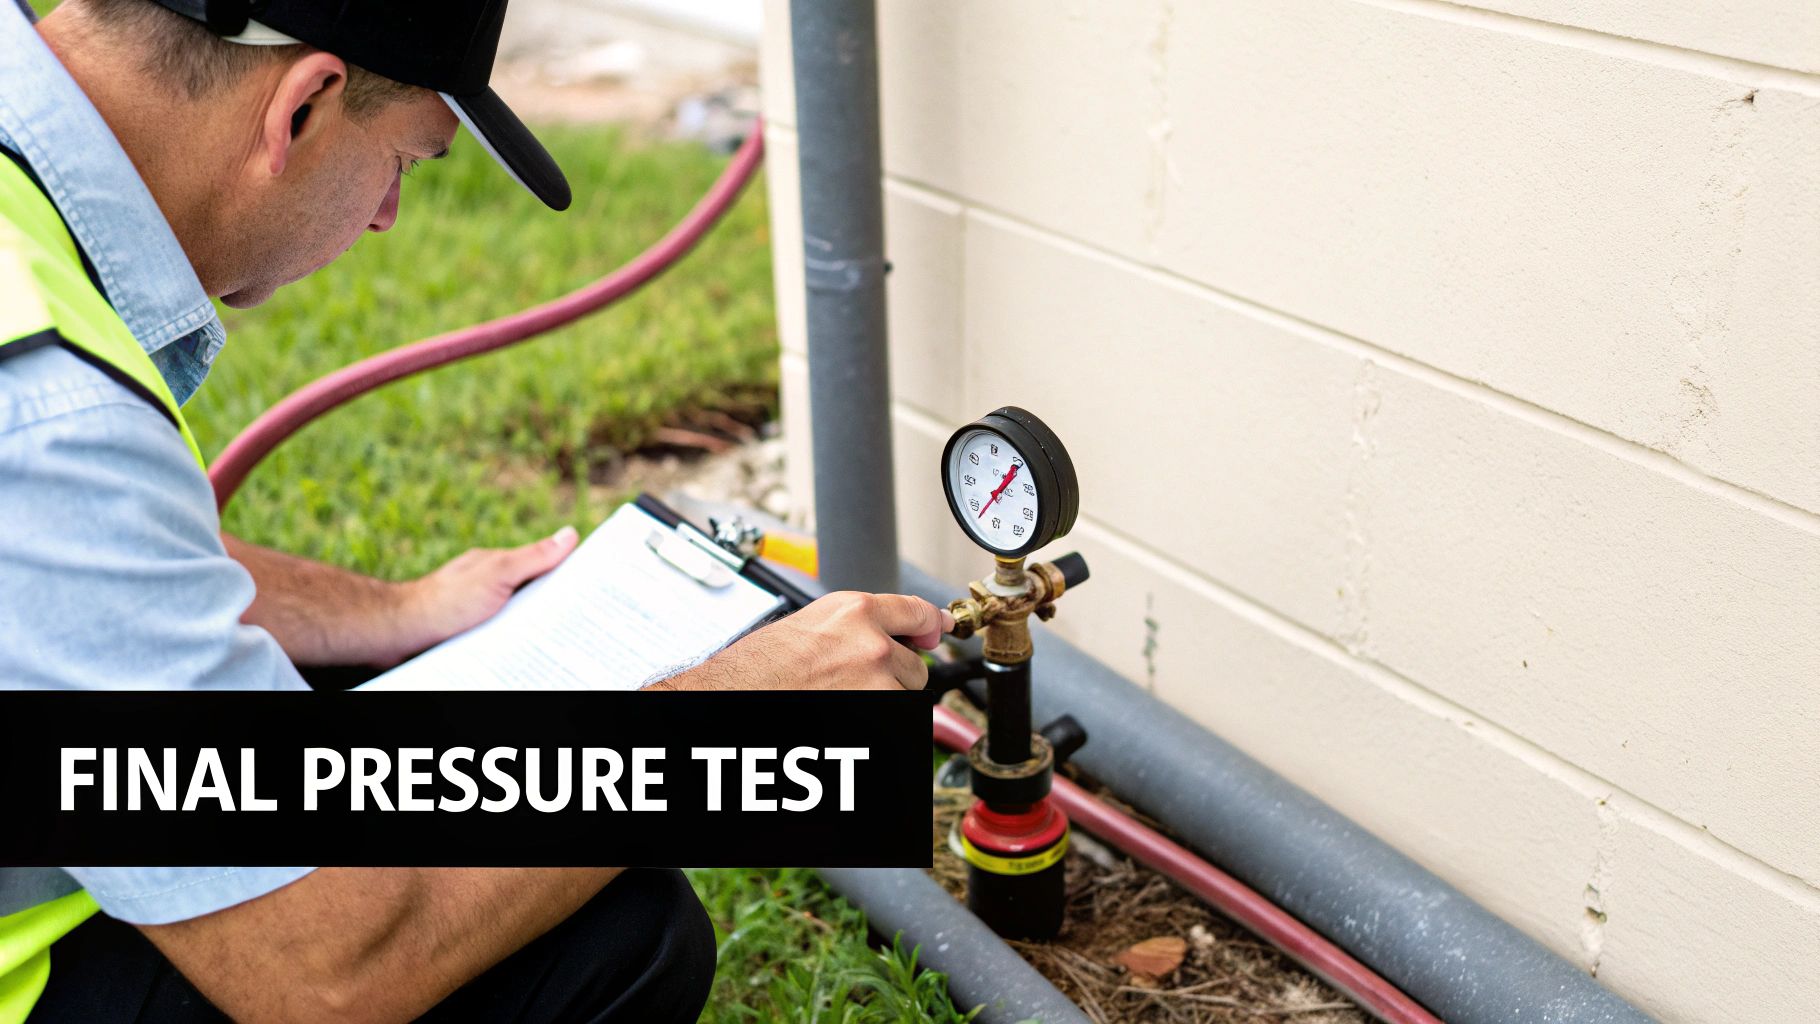
Alright, the last fitting is tight and the pipes are all in place. Think you're done? Not even close. The most critical part of any natural gas line installation comes next: proving the system is 100% airtight.
This is where the pressure test and the final inspection come in. These aren't just formalities; they're the ultimate quality control checks that ensure your work is safe, compliant, and ready for service. Passing this stage is non-negotiable—it’s the official sign-off that turns your hard work into a functioning gas system.
Setting Up the Pressure Test
Before you even think about calling an inspector, you need to test your own work. This means sealing off the entire system and pressurizing it with air or an inert gas like nitrogen. Let me be crystal clear: never use natural gas itself for testing. It's incredibly dangerous and strictly forbidden.
The goal here is simple: see if the system can hold pressure over time without a single drop. You’ll need a proper testing rig, which is usually just a well-calibrated, easy-to-read pressure gauge. This is your best shot at finding and fixing any tiny leaks before the inspector shows up.
A standard testing setup will include:
- A quality, low-pressure gauge, something like a 0-15 PSI model with clear markings.
- An air compressor or a nitrogen tank with a regulator.
- The right fittings to connect your rig to the gas piping, usually at an appliance stub-out or valve.
Make sure every single connection is part of the test, from where you tied into the main line all the way to the last appliance stub. You need to verify the integrity of the entire system.
Understanding Test Requirements
Pressure testing isn’t a guessing game. Your local code will have the exact numbers, but a common standard is to pressurize the system to at least 1.5 times its working pressure, which usually means no less than 3 PSI. For most residential jobs, testing at around 10 PSI is a safe bet.
Time is just as important as pressure. An inspector will want to see that gauge hold perfectly steady for a specific period, often between 15 and 30 minutes. This proves there are no slow, sneaky leaks.
An old-timer inspector once told me, "The gauge is the truth teller. It has no reason to lie." If that needle moves even a fraction, you have a leak. Don't try to explain it away; find it and fix it.
If you see the pressure drop, it's time to go leak hunting. Grab a spray bottle filled with a good leak detector solution and hit every single joint, fitting, and valve. Even the tiniest bubble tells you where your problem is. Fix it, then test it again.
Preparing for the Final Walk-Through
Once you've successfully held pressure, it's time to schedule the final inspection with the building authority or utility company. Don't make the inspector wait. Have all your paperwork—approved permits, plans, everything—ready to go.
Inspectors are paid to be meticulous, and they follow a clear checklist. They’re looking for a lot more than just a stable pressure gauge.
Here’s what they’ll be looking for:
- Approved Materials: Did you use the right pipe, fittings, and valves for the job? They'll check.
- Correct Burial Depth: For underground lines, they’ll measure the trench depth to ensure it meets code.
- Proper Support: Is the interior piping securely strapped at the required intervals? Sagging pipes mean failed inspections.
- Appliance Shutoffs: Every gas appliance needs its own accessible shutoff valve. They’ll check each one.
Honestly, one of the most common reasons for failure is a simple oversight—a missed pipe strap, a valve that’s hard to reach, or improper backfill. Do yourself a favor and perform your own final walk-through before the inspector arrives. Catching these small mistakes yourself will save you the headache and cost of a re-inspection.
Answering Your Top Gas Line Installation Questions
Even the most buttoned-up project plan will have a few question marks, and when it comes to running new gas lines, those questions need solid answers. Let's walk through the most common things builders and homeowners ask, because getting this right is all about safety, budget, and hitting your deadlines.
Think of this less as a technical FAQ and more as a real-world guide to navigating the variables that can trip you up. A bit of know-how here saves a lot of headaches later.
What’s the Real Cost of Installing a Gas Line?
This is always the first question, and the honest answer is, "it depends." There's no flat rate because every job is unique. The price tag for a natural gas line installation is really a sum of its parts.
Here’s what will shape your final quote:
- Length of the Line: The longer the run, the more pipe and labor you'll need. It's a straightforward cost driver.
- Pipe Material: You'll likely see a mix of materials. High-density polyethylene (HDPE) is standard for underground work, while black steel is common indoors. They come with different material and labor costs.
- Site Complexity: This is a big one. A simple trench in soft soil is one thing. Boring under a concrete driveway or carefully digging around a maze of tree roots and existing utilities? That's a whole different ballgame and a much bigger expense.
- Permit Fees: Your local municipality sets these, and they can vary wildly from one town to the next.
For a standard residential job, you might see costs anywhere from $500 to over $2,500. But for larger, more complex commercial projects, that number can easily soar into the tens of thousands. The only way to know for sure is to get multiple, detailed quotes from qualified pros.
How Long Is This Actually Going to Take?
Once the permits are approved and the crew is on-site, a simple residential installation might only take a day or two. But don't let that fool you—the total project timeline is a different story.
The biggest wildcard is almost always the permitting process. In some places, it’s quick. In others, you could be waiting weeks, or even months, for the green light. After the work is done, you also have to factor in scheduling the final inspection with the utility company, which can add more waiting time. Always bake a buffer into your schedule for this administrative legwork.
The thing to remember is that the hands-on installation is usually the fastest part of the whole endeavor. The real timeline is dictated by paperwork and waiting for other people. Plan for those delays from the start to keep your clients happy.
It's also worth noting the bigger picture. The global energy market can even affect your local project. A recent report showed that while global natural gas supply grew by 65 bcm in 2024, demand shot up by 78 bcm. This mismatch creates bottlenecks, meaning the infrastructure—and the skilled labor for gas line installations—can't always keep up with demand. This is exactly what leads to the kind of project delays you want to avoid. You can see the full breakdown in the 2025 Global Gas Report.
Who Can Actually Do This Work?
This is non-negotiable: gas line work is not a job for a general handyman or your average plumber. This work must be done by a licensed and certified professional who is specifically qualified for gas piping.
In most jurisdictions, plumbers need to go through extra training and pass specific exams to earn their gas line certification. Before you hire anyone, ask to see their license and proof of insurance. Hiring someone who isn't qualified isn't just a recipe for a failed inspection; it's a serious safety hazard that could lead to a dangerous gas leak. This is one corner you can never, ever cut.
When permanent gas line installations get bogged down by delays, your project doesn't have to grind to a halt. Blue Gas Express provides reliable, on-demand temporary natural gas solutions to keep your site powered and your timeline intact. Learn how we can bridge the gap and keep your project moving forward.